
- A+
熟悉Docker的朋友都知道,Docker是可以开启远程控制API的,默认监听TCP 2375端口,它有非常丰富的接口方法,可以用来远程控制Docker Daemon来做很多操作。Docker版本迭代很快,因此不同的版本官方也提供了不同版本的API文档,本文主要基于当前最新的v1.40简单介绍下一些常用操作及最佳实践。
一、安装Docker
Centos 系统可以直接使用yum命令在线安装,具体可以参考官方文档,下面提供一个Linux系统通用的在线安装方法:
1、国外的主机:
1 | curl -sSL https://get.docker.com | sh |
2、国内的主机:
更多系统的安装方法可参考前人整理的文档,成功安装后,可执行 docker info、docker version、docker ps 等命令测试是否正常,具体过程不再赘述。
3、镜像加速
如果是国内的主机,为了让后面的实践操作更加顺畅,这里可以配置一下DaoCloud提供的的Docker镜像加速,执行如下2条命令即可:
2
3
4
curl -sSL https://get.daocloud.io/daotools/set_mirror.sh | sh -s http://f1361db2.m.daocloud.io
# 重启Docker
systemctl restart docker
二、启用API
为了保证安全,Docker安装后默认不会启用远程API服务,因为这个服务默认不做权限认证。本文主要是做实践分享,且用于内网生产环境,安全上会有保证,如果是外网生产环境建议做好iptables安全加固或用完即焚或使用TLS安全认证,此处不表。
开启方法比较简单,此处只分享CentOS 7系统的启用步骤:
1、修改配置:
找到ExecStart配置项,默认如下:
在其中插入监听选项:-H tcp://0.0.0.0:2375(如果是内网生产环境,请将0.0.0.0改为内网IP),最后为:
2、重启Docker:
2
systemctl restart docker
3、查看结果,如下即为成功:
2
tcp6 0 0 :::2375 :::* LISTEN 3586/dockerd
4、查看API版本:
2
3
4
5
6
7
8
9
10
11
12
13
14
15
16
17
18
19
20
21
22
23
24
25
26
27
28
Client: Docker Engine - Community
Version: 19.03.2
API version: 1.40 # 本机Docker作为客户端的版本
Go version: go1.12.8
Git commit: 6a30dfc
Built: Thu Aug 29 05:28:55 2019
OS/Arch: linux/amd64
Experimental: false
Server: Docker Engine - Community
Engine:
Version: 19.03.2
API version: 1.40 (minimum version 1.12) # 本机Docker作为服务端的版本
Go version: go1.12.8
Git commit: 6a30dfc
Built: Thu Aug 29 05:27:34 2019
OS/Arch: linux/amd64
Experimental: false
containerd:
Version: 1.2.6
GitCommit: 894b81a4b802e4eb2a91d1ce216b8817763c29fb
runc:
Version: 1.0.0-rc8
GitCommit: 425e105d5a03fabd737a126ad93d62a9eeede87f
docker-init:
Version: 0.18.0
GitCommit: fec3683
三、Docker API初探
完成上述步骤后,Docker就已经支持远程控制了,我们先参考官方文档试试拉起一个镜像(下文的操作均在本地完成,因此IP均为127.0.0.1):
1、调用API拉取centos最新镜像:
2、调用API创建一个容器,指定一个前台阻塞命令 tail -f /dev/null:
2
3
4
5
6
7
8
9
10
11
12
"Image": "centos:latest",
"HostConfig": {
"NetworkMode": "host",
"Binds": [
"/tmp:/tmp"
]
},
"Cmd": [
"tail","-f","/dev/null"
]
}'
成功返回如下:
3、调用API启动刚刚创建的容器:
2
3
4
curl -XPOST http://127.0.0.1:2375/containers/b88c7c986ecd5fdf174f79b00e024087b47241cd40653bcb05df70fba5cc398f/start
# 也可以使用上一步定义的容器名称demo1来启动:
curl -XPOST http://127.0.0.1:2375/demo1/start
4、查看启动中的容器:
2
ed9f2150f8d5 centos:latest "tail -f /dev/null" About a minute ago Up About a minute demo1
5、调用容器执行命令:
调用API,对已存在的容器demo1创建命令实例:
2
3
4
5
6
7
8
9
10
11
12
13
"AttachStdout": true,
"AttachStderr": true,
"DetachKeys": "ctrl-p,ctrl-q",
"Tty": false,
"Cmd": [
"sh","-c","date | tee /tmp/test_exec.log"
],
"Env": [
"FOO=bar",
"BAZ=quux"
]
}'
返回结果为命令实例Id:
继续调用API启动这个命令实例:
2
3
4
5
"Detach": false,
"Tty": false
}'
Fri Oct 4 03:21:36 UTC 2019
如上返回了一个date命令的回显,并且会在挂载的/tmp目录生成test_exec.log文本,内容和上一步回显一致:
2
Fri Oct 4 03:21:36 UTC 2019
说明命令被成功执行!
上述步骤,简单的展示了Docker API的常见场景,可以说Docker API极大的简化了运维工作,比如我们常说的CI/CD就可以不再依赖ssh通道或自建agent了,一个接口就可以搞定应用的全生命周期,简直是运维大救星!
Ps:更多Docker API的用法可以参考官方文档。
四、Python-SDK初探
Docker是如此的流行,肯定少不了各语言配套的SDK,运维最常用的高级语言是Python,因此这里简单的介绍下Docker的Python SDK,并使用Python的SDK来实现上文API的繁琐操作:
1、安装SDK:
2
3
4
5
yum install python-pip
pip install --upgrade pip
# 安装SDK
pip install docker
2、寥寥数行代码就可以实现第三步的繁琐过程:
2
3
4
5
6
7
8
9
10
11
12
13
14
15
import docker
# 初始化,这里可以根据目标docker版本执行API版本,如果后面报错则需要调整此处为目标的同版本或更低版本
client = docker.DockerClient(version='1.40', base_url='tcp://127.0.0.1:2375')
# 拉取镜像
client.images.pull('centos:latest')
# 拉起容器
client.containers.run(image='centos:latest', name='demo1', command='tail -f /dev/null',volumes={'/data': {'bind': '/tmp', 'mode': 'rw'}}, detach=True)
# 先通过容器名获取对象
container = client.containers.get('demo1')
# 通过对象执行命令
result = container.exec_run(cmd='sh -c "date | tee /tmp/test_sdk.log"', detach=False, tty=True, stdin=True, stdout=True)
# 输出执行命令的返回码和返回结果
print(result.exit_code)
print(result.output.decode())
上述代码保存为 test_sdk.py,执行 python test_sdk.py 后查看结果:
2
3
4
5
0
Sun Oct 6 01:48:58 UTC 2019
[local ~]# cat /data/test_sdk.log
Fri Oct 4 03:35:14 UTC 2019
通过SDK的操作演示,可以很明显的看到操作步骤极大的简化了,整体过程变得更加流畅!
Ps:更多的玩法可以参考官方文档。
五、实战Haproxy远程管理
上文的实践证明,有了Docker Remote API这个运维利器(通道),很多传统运维手段都可以被革新,下面简单介绍一下,我们如何利用Docker Remote API来实现Haoproxy的远程管理(所有代码和镜像均已上传到GitHub和DockerHub)。
1、原理介绍
首先,我们构建一个Haporxy配置集中管理服务,用于界面化管理Haproxy配置,并提供可拉取到指定配置内容的接口,比如:
然后,在Haproxy镜像里面集成一个shell脚本,用于拉取、比对、更新Haproxy的配置文件。
最后,远程调用Docker Remote API 执行Haproxy容器里面的shell脚本更新Haproxy配置,如果更新成功则继续调用Docker API 重载Haproxy配置,即可完成Haproxy配置的平滑更新。
2、快速构建中心配置管理服务
为了快速演示效果,这里直接使用Nginx部署一个Haproxy配置的下载服务,实际使用肯定要构建一个更完善的管理平台。
2
3
4
5
6
7
8
yum install -y nginx
# 启动Nginx
/sbin/nginx
# 创建一个极简haproxy配置文件
cat > /usr/share/nginx/html/127.0.0.1
3、制作Haproxy镜像:
这里直接基于官方的镜像,额外集成用于更新Haproxy配置的脚本以及一些常用命令(curl、vim、ps):
Dockerfile内容如下:
2
3
4
5
6
7
8
9
10
RUN apt-get update
&& apt-get install -y curl vim procps
&& apt-get purge -y --auto-remove -o APT::AutoRemove::RecommendsImportant=false
COPY update_cfg.sh /opt/
COPY docker-entrypoint.sh /
CMD ["haproxy","-f","/etc/haproxy.cfg"]
update_cfg.sh 用于下载、比对、更新Haproxy配置,语法、逻辑都比较简单,感兴趣的可以看看:
2
3
4
5
6
7
8
9
10
11
12
13
14
15
16
17
18
19
20
21
22
23
24
25
26
27
28
29
30
31
32
33
34
35
36
37
38
39
40
41
42
43
44
45
46
47
48
49
50
51
52
53
54
55
56
57
58
59
60
61
62
63
64
65
66
67
68
69
70
71
72
73
74
75
76
77
78
79
80
81
82
83
84
85
86
87
88
89
90
91
92
93
source /etc/profile
if [ -z $VIP ];then
echo 'ENV ${VIP} is not SET, Plz check!'
exit 1
fi
# Define and create storage directory
etc_dir=${STORAGE_DIR:-/usr/local/haproxy/etc}
temp_dir=${etc_dir}/temp
back_dir=${etc_dir}/backup
mkdir -p ${back_dir} ${temp_dir}
# Define the configration file
current_cfg=${etc_dir}/${VIP}.cfg
backup_cfg=${back_dir}/${VIP}_$(date +%F-%H%M%S).cfg
temp_cfg=${temp_dir}/${VIP}.cfg
# Define file download configration
curl_bin=$(which curl)
cfg_manage_api=${CFG_GET_URL:-http://your_haporxy_download_svr/haproxy/}${VIP} # 这里需要根据配置管理服务的实际情况修改地址
# console log
report_log()
{
echo "[$(date '+%F %H:%M:%S')] $*"
}
# backup current configration file
backup_cfg()
{
if [ -f ${current_cfg} ];then
cp -a ${current_cfg} ${backup_cfg} &&
report_log "Backup ${current_cfg} to ${backup_cfg} success." ||
report_log "Backup ${current_cfg} to ${backup_cfg} failed."
else
report_log "${current_cfg} is not exist, maybe the first release, skiped."
fi
}
# update current configration file
cover_cfg()
{ if [ -f ${temp_cfg} ];then
cp -a ${temp_cfg} ${current_cfg} &&
report_log "Cover ${temp_cfg} to ${current_cfg} success." || (
report_log "Cover ${temp_cfg} to ${current_cfg} failed."
exit 1
)
else
report_log "${temp_cfg} is not exist, Unknow Error, exited."
exit 1
fi
}
# download latest configration file from download svr
download_cfg()
{
report_log "Starting Download configration file to ${temp_cfg} ..."
ret_code=$(${curl_bin} -s --max-time 120 --retry 3 -w %{http_code} -o ${temp_cfg} ${cfg_manage_api})
if [ $ret_code -eq 200 ] && [ $? -eq 0 ];then
report_log "Download configration file ${temp_cfg} success."
else
report_log "Download configration file ${temp_cfg} failed."
exit 1
fi
}
# check the latest configration
check_cfg()
{
old_md5=$(test -f ${current_cfg} && md5sum ${current_cfg} | awk '{print $1}' 2>/dev/null )
new_md5=$(md5sum ${temp_cfg}|awk '{print $1}')
if [ "$old_md5" = "$new_md5" ];then
report_log "The configuration file ${VIP}.cfg is the same, no need update."
return 2
fi
if haproxy -c -W -f ${temp_cfg} >/dev/null ;then
report_log "Configuration file ${temp_cfg} is valid."
return 0
else
report_log "Configuration file ${temp_cfg} is invalid."
return 1
fi
}
download_cfg
if check_cfg;then
backup_cfg
cover_cfg &&
report_log "${current_cfg} is updated success!"
else
exit $?
fi
docker-entrypoint.sh 改自Haproxy官方镜像,在默认逻辑块加入了对VIP环境变量的判断、配置文件的更新下载、配置文件软链接建立、配置语法校验等逻辑:
2
3
4
5
6
7
8
9
10
11
12
13
14
15
16
17
18
19
20
21
22
23
24
25
# first arg is `-f` or `--some-option`
if [ "${1#-}" != "$1" ]; then
set -- haproxy "$@"
fi
if [ "$1" = 'haproxy' ]; then
if [ -z $VIP ];then
echo echo "[$(date '+%F %H:%M:%S')] ENV ${VIP} is not SET, Plz check!"
exit 1
fi
bash /opt/update_cfg.sh
ln -sf /usr/local/haproxy/etc/${VIP}.cfg /etc/haproxy.cfg
haproxy -W -c -f /etc/haproxy.cfg || (
echo "[$(date '+%F %H:%M:%S')] Haproxy Configuration file check failed, Plz check!"
exit 1
)
shift # "haproxy"
# if the user wants "haproxy", let's add a couple useful flags
# -W -- "master-worker mode" (similar to the old "haproxy-systemd-wrapper"; allows for reload via "SIGUSR2")
# -db -- disables background mode
set -- haproxy -W -db "$@"
fi
exec "$@"
准备好上述文件后,在文件同级目录执行如下命令构建Haproxy镜像(实际这一步也可以通过API来操作,这里不再赘述,详见官方文档):
2
3
4
chmod +x *.sh
# 如果有私有仓库的可以撸到私有仓库,本文主要是分享,这里直接本地构建:
docker build -t "haproxy-plus:latest" ./
4、拉起Haproxy容器
为了贴合文章主题,所以这里继续用Docker API远程方式拉起容器:
2
3
4
5
6
import docker
client = docker.DockerClient(version='1.40', base_url='tcp://127.0.0.1:2375')
#client.images.pull('haproxy-plus:latest') # 本地测试,所以这里不需要拉取镜像
client.containers.run(image='haproxy-plus:latest', name='demo2', volumes={'/data/images/haproxy/etc': {
'bind': '/usr/local/haproxy/etc', 'mode': 'rw'}}, network_mode='host', environment=["VIP=127.0.0.1", "CFG_GET_URL=http://127.0.0.1/"], detach=True)
几个关键的设置说明:
- 挂载本地目录 /data/images/haproxy/etc 到容器 /usr/local/haproxy/etc 目录,用于持久化配置;
- 环境变量 VIP,用于指定haproxy的配置名称(在我们这边其实就是VIP地址),也是为了通过接口拉取到指定配置;
- 环境变量 CFG_GET_URL,拉取Haproxy配置的地址,组合VIP后就是 http://127.0.0.1/127.0.01,即上文的临时搭建的下载地址
上述Python代码保存为start.py,执行结果如下:
2
3
4
5
6
7
8
9
10
[local haproxy]# docker logs -f demo2 # 查看执行日志
[2019-10-04 04:32:10] Starting Download configration file to /usr/local/haproxy/etc/temp/127.0.0.1.cfg ...
[2019-10-04 04:32:10] Download configration file /usr/local/haproxy/etc/temp/127.0.0.1.cfg success.
[2019-10-04 04:32:10] Configuration file /usr/local/haproxy/etc/temp/127.0.0.1.cfg is valid.
[2019-10-04 04:32:10] /usr/local/haproxy/etc/127.0.0.1.cfg is not exist, maybe the first release, skiped.
[2019-10-04 04:32:10] Cover /usr/local/haproxy/etc/temp/127.0.0.1.cfg to /usr/local/haproxy/etc/127.0.0.1.cfg success.
[2019-10-04 04:32:10] /usr/local/haproxy/etc/127.0.0.1.cfg is updated success!
Configuration file is valid
[NOTICE] 276/043210 (1) : New worker #1 (27) forked
通过Docker的日志,启动过程解析如下:
- 通过接口下载Haproxy配置,保存为 /usr/local/haporxy/etc/temp/127.0.0.1.cfg;
- 执行Haproxy配置语法校验:haproxy -c -W /usr/local/haproxy/etc/temp/127.0.0.1.cfg;
- 语法校验成功后,通过MD5值来比对配置是否有更新,发现找不到原来的配置,说明是首次启动;
- 拷贝临时配置文件到正式配置文件:/usr/local/haproxy/etc/127.0.0.1.cfg
- 启动Haproxy成功:New worker #1 (27) forked
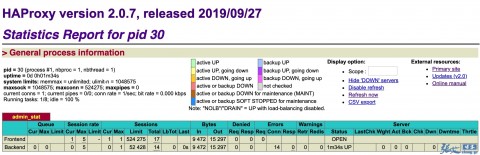
此时,访问配置haproxy状态页面 http://:8080/haproxy,输入账号密码:admin/123456 看看效果:
结果符合预期,下面我们来尝试更新配置,更新脚本编写如下,对Docker API的SDK稍微做了下封装:
2
3
4
5
6
7
8
9
10
11
12
13
14
15
16
17
18
19
20
21
22
23
24
25
26
27
28
29
30
31
32
33
34
35
36
37
38
import docker
class dockerApi():
def __init__(self,ip,port=2375):
self.base_url = 'tcp://%s:%s' % (ip,port)
self.client = docker.DockerClient(
version='1.40', base_url=self.base_url)
def exec_cmd(self,container_name, cmd='echo ok',decode=True):
container = self.client.containers.get(container_name)
result = container.exec_run(
cmd=cmd, detach=False, tty=True, stdin=True, stdout=True)
ret_code = result.exit_code
if decode:
ret_info = result.output.decode()
else:
ret_info = result.output
return ret_code, ret_info
def send_kill(self, container_name):
container = self.client.containers.get(container_name)
container.kill('SIGUSR2')
# 定义haproxy宿主机IP,可以是多个
ld_list = ['127.0.0.1']
# 定义更新配置的命令
cmd = 'bash /opt/update_cfg.sh'
# 定义容器名称
container_name = 'demo2'
# 开始更新
for i in ld_list:
obj = dockerApi(i)
ret_code,ret_info = obj.exec_cmd(container_name, cmd)
print '%s exec %s ret_code is: %s, exec ret_info:' % (i, cmd, ret_code)
print ret_info
if int(ret_code) == 0:
obj.send_kill(container_name)
保存为 update.py,执行结果如下:
2
3
4
5
127.0.0.1 exec bash /opt/update_cfg.sh ret_code is: 2, exec ret_info:
[2019-10-04 04:55:41] Starting Download configration file to /usr/local/haproxy/etc/temp/127.0.0.1.cfg ...
[2019-10-04 04:55:41] Download configration file /usr/local/haproxy/etc/temp/127.0.0.1.cfg success.
[2019-10-04 04:55:41] The configuration file 127.0.0.1.cfg is the same, no need update.
日志提示为,配置没有变化,所以不需要升级,符合预期。下面,我们修改中心配置,将监听的端口从8080改为8181:
再次执行结果如下:
2
3
4
5
6
7
8
127.0.0.1 exec bash /opt/update_cfg.sh ret_code is: 0, exec ret_info:
[2019-10-04 05:03:43] Starting Download configration file to /usr/local/haproxy/etc/temp/127.0.0.1.cfg ...
[2019-10-04 05:03:43] Download configration file /usr/local/haproxy/etc/temp/127.0.0.1.cfg success.
[2019-10-04 05:03:43] Configuration file /usr/local/haproxy/etc/temp/127.0.0.1.cfg is valid.
[2019-10-04 05:03:43] Backup /usr/local/haproxy/etc/127.0.0.1.cfg to /usr/local/haproxy/etc/backup/127.0.0.1_2019-10-04-050343.cfg success.
[2019-10-04 05:03:43] Cover /usr/local/haproxy/etc/temp/127.0.0.1.cfg to /usr/local/haproxy/etc/127.0.0.1.cfg success.
[2019-10-04 05:03:43] /usr/local/haproxy/etc/127.0.0.1.cfg is updated success!
相比首次启动的日志,更新配置的过程如下:
- 通过接口下载Haproxy配置,保存为 /usr/local/haporxy/etc/temp/127.0.0.1.cfg;
- 执行Haproxy配置语法校验:haproxy -c -W /usr/local/haproxy/etc/temp/127.0.0.1.cfg;
- 语法校验成功后,通过MD5值来比对配置是否有更新,如果有更新,先备份原配置文件到 /usr/local/haproxy/etc/backup/127.0.0.1_2019-10-04-050343.cfg;
- 拷贝临时配置文件到正式配置文件:/usr/local/haproxy/etc/127.0.0.1.cfg
由于容器里面的update_cfg.sh脚本仅更新配置文件,因此Python脚本最后一步还会校验脚本返回码,如果是符合预期的将会发送一个kill指令,平滑重载Haproxy,这里主要是用到的Haproxy的-W参数,官方解释如下:
If you used a bind mount for the config and have edited your haproxy.cfg file, you can use HAProxy's graceful reload feature by sending a SIGHUP to the container:
$ docker kill -s HUP my-running-haproxy
The entrypoint script in the image checks for running the command haproxy and replaces it with haproxy-systemd-wrapper from HAProxy upstream which takes care of signal handling to do the graceful reload. Under the hood this uses the -sf option of haproxy so "there are two small windows of a few milliseconds each where it is possible that a few connection failures will be noticed during high loads" (see Stopping and restarting HAProxy). Image Variants
继续查看容器的日志,可以看到有2段日志,第一段是首次启动,第二段则是更新配置后,发送kill指令,Haproxy重载的日志:
2
3
4
5
6
7
8
9
10
11
12
13
14
15
16
[2019-10-04 05:03:19] Starting Download configration file to /usr/local/haproxy/etc/temp/127.0.0.1.cfg ...
[2019-10-04 05:03:20] Download configration file /usr/local/haproxy/etc/temp/127.0.0.1.cfg success.
[2019-10-04 05:03:20] Configuration file /usr/local/haproxy/etc/temp/127.0.0.1.cfg is valid.
[2019-10-04 05:03:20] /usr/local/haproxy/etc/127.0.0.1.cfg is not exist, maybe the first release, skiped.
[2019-10-04 05:03:20] Cover /usr/local/haproxy/etc/temp/127.0.0.1.cfg to /usr/local/haproxy/etc/127.0.0.1.cfg success.
[2019-10-04 05:03:20] /usr/local/haproxy/etc/127.0.0.1.cfg is updated success!
Configuration file is valid
[NOTICE] 276/050320 (1) : New worker #1 (27) forked
[WARNING] 276/050343 (1) : Reexecuting Master process
[NOTICE] 276/050343 (1) : New worker #1 (53) forked
[WARNING] 276/050343 (27) : Stopping proxy admin_stat in 0 ms.
[WARNING] 276/050343 (27) : Stopping frontend GLOBAL in 0 ms.
[WARNING] 276/050343 (27) : Proxy admin_stat stopped (FE: 0 conns, BE: 0 conns).
[WARNING] 276/050343 (27) : Proxy GLOBAL stopped (FE: 0 conns, BE: 0 conns).
[WARNING] 276/050343 (1) : Former worker #1 (27) exited with code 0 (Exit)
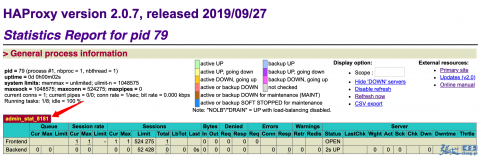
最后,再次访问Haporxy的状态页面 http://:8181/haproxy 验证效果,端口已成功更新为8181,符合预期:
上述更新配置、重载的过程经过我实测,确认是平滑无损的。在生产环境,我们只需要在运维平台集中管理Haproxy的配置,就可以通过Docker的API来控制Haproxy进行秒级配置更新了!是不是相当给力?

这里顺便分享一个好消息:Haproxy最新的2.0已经支持Dataplaneapi来远程管理配置了,感兴趣的可以看下官方文档。
但是由于历史包袱,我们这边如果要切到Dataplaneapi的管理模式需要投入较多的开发资源,因此放弃,暂时继续上述分享的管理方案,后续人力充足再考虑切到Dataplaneapi的更细致的管理模式。
六、小结
本文从Docker安装、Docker Remote API以及Python SDK的使用,较为详细的展示了Docker Remote API的常用场景,最后基于Docker Remote API分享了一个可快速落地的Haproxy远程管理最佳实践,希望对有需要的朋友有所帮助。